
Before you begin
- Labs create a Google Cloud project and resources for a fixed time
- Labs have a time limit and no pause feature. If you end the lab, you'll have to restart from the beginning.
- On the top left of your screen, click Start lab to begin
Create SQL derived table
/ 10
Create native derived table
/ 10
Add a derived column in the view file for the native derived table
/ 10
Looker is a modern data platform in Google Cloud that lets business users analyze and visualize data interactively. LookML developers curate the data used by business users by creating new fields, tables, and views to customize and organize data.
In Looker, LookML developers can use derived tables to create new tables that are not already defined in the underlying database. For example, as a LookML developer, you can create derived tables to summarize details from existing tables, such as order details for each user in an ecommerce dataset.
In this lab, you learn how to create both types of derived tables in LookML: SQL derived tables and native derived tables. You also learn how to define new columns that do not already exist in the underlying data and add them to native derived tables. Last, you learn how to persist derived tables in LookML, so that they can be written back to the underlying database.
For this lab, a project called qwiklabs-ecommerce has been created for you in LookML. This project is based on a mock ecommerce dataset containing information on orders, products, and users.
Learn more about LookML modeling in the Writing LookML section of Looker's documentation.
In this lab, you will create and persist derived tables in LookML.
For each lab, you get a new project and set of resources for a fixed time at no cost.
Make sure you have signed into Qwiklabs using an incognito window.
Note the lab's access time (for example, 2:00:00 hrs) and make sure you can finish in that time block.
 .
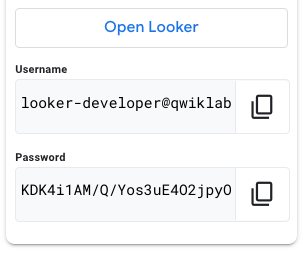
.A new panel will appear with the temporary credentials that you must use for this lab.
If you need to pay for the lab, a pop-up will open for you to select your payment method.
Tip: Open Looker in a new tab or a separate window, so you can see both the lab instructions and the Looker instance.
Important: You must use the credentials from the Connection Details panel on this page. Do not use your Qwiklabs credentials. If you have your own Looker account, do not use it for this lab.
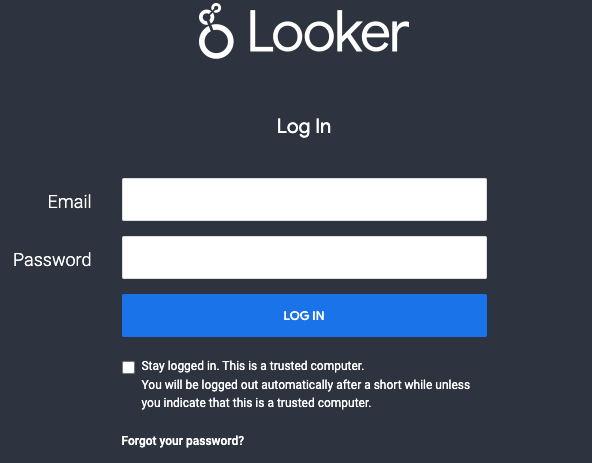
After a successful login, you will see the Looker instance for this lab.
In LookML, you can define derived tables using either SQL queries to define a SQL derived table, or Explore queries to define a native derived table.
In this task, you write a SQL query to define a new SQL derived table that summarizes order details for each user, including the total number of orders and total revenue for each user. Then, you create a new view file for the SQL derived table in the qwiklabs-ecommerce project.
If it is not already enabled, enable development mode. On the bottom left of the Looker User Interface, click the toggle button to enter Development mode.
On the left side navigation menu of the Looker User Interface, click Develop. Then, click SQL Runner.
In the SQL Query window, add the following query:
The results indicate that the query successfully summarizes all orders for each user. Specifically, the query is returning the user ID, count of orders, and total revenue from orders for each user.
Notice that the LIMIT clause is used to reduce the amount of data returned during this test; you will remove the LIMIT clause in an upcoming step when you create a new view file for the SQL derived table.
Click on the settings gear icon (
For Project, select qwiklabs-ecommerce.
For View Name, type user_order_details, and click Add.
You are redirected to the Looker Integrated Development Environment (IDE) to review the newly created view file for your SQL derived table.
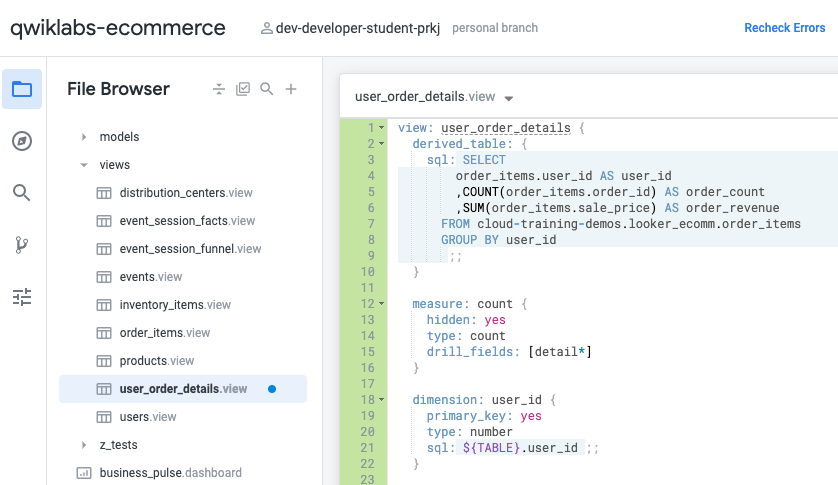
Notice that the new view file for the user_order_details view has been created outside of the views folder.
Click user_order_details.view and drag it under the views folder.
Click on the arrow next to views to see the list of views.
Click user_order_details.view to see the view file for the SQL derived table.
Notice that Looker auto-generates a dimension for each column in the SELECT clause of the SQL query as well as a new count measure.
In the next steps, you modify the view file to remove the LIMIT clause which is no longer desired, hide the new count measure, and add a primary key for the view.
Delete the code line for LIMIT 10 from the sql parameter.
In the measure: count definition, add a new line before type: count, and type hidden: yes.
In the dimension: user_id definition, add a new line before type: number, and type primary_key: yes.
This SQL derived table is now ready to be joined to an Explore, modified with more dimensions and measures, etc. In the next steps, you will send your LookML changes to production, so that other LookML developers can use the view file for your SQL derived table and finalize it as needed.
Click Validate LookML and then click Commit Changes & Push.
In the Commit window, add a message to specify the changes you made, and click Commit.
Click Deploy to Production.
In the next task, you will recreate the table as a native derived table using existing LookML dimensions and measures. Then, you will join the native derived table to an Explore, so that you can test the new table in the Explore and make it available to business users.
Click Check my progress to verify the objective.
In this task, you use an Explore query to recreate the derived table from Task 1 as a native derived table. Then, you create a new view file for the native derived table in the qwiklabs-ecommerce project.
On the left side navigation menu of the Looker User Interface, click Explore.
Under E-Commerce Training, click Order Items.
Click the arrow next to Order Items.
The available dimensions and measures will be listed in the data panel for Order Items.
Under Order Items > Dimensions, click User ID.
Under Order Items > Measures, click Order Count.
Under Order Items > Measures, click Total Revenue.
Click Run to see the results.
The Explore query returns the User ID, count of orders, and total revenue from orders for each user.
Click on the settings gear icon (
Select the tab for Derived Table.
Copy the LookML code for the derived table.
In the next section, you paste the LookML code for the derived table into a new view file.
Open a new Looker window in a new tab.
On the left side navigation menu of the Looker User Interface, click Develop.
Under Projects, click on qwiklabs-ecommerce.
Next to File Browser, click the Add file or folder icon (
Select Create View.
For file name, type user_order_summary.
Click Create.
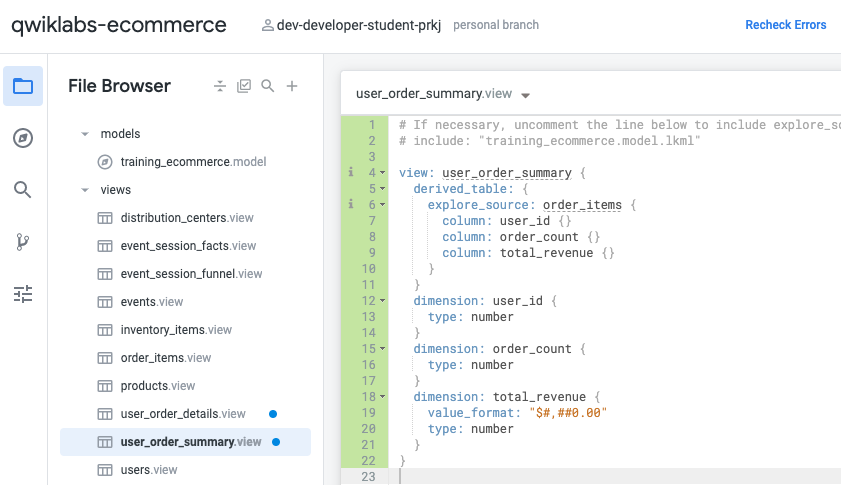
Notice again that the new view file for the user_order_summary view has been created outside of the views folder.
Click user_order_summary.view and drag it under the views folder.
Click on the arrow next to views to see the list of views.
Click user_order_summary.view to see the view file for the native derived table.
Delete all of the auto-generated LookML in the view file.
Paste the LookML code you copied for the native derived table.
Replace the auto-generated view name (e.g. add_a_unique_name_1620763463) with user_order_summary.
In the next task, you will join this new view to an Explore, so that the view is accessible to business users.
For business users to view the data in a derived table, the view containing the derived table definition must either be added as the base view of an Explore or be joined to an existing Explore. The steps to join a view for a derived table to an Explore are the same whether the view is created for a SQL or native derived table.
In this task, you join the view for the native derived table to the order_items explore definition in the model file of the qwiklabs-ecommerce project. Then, you review the data and the generated SQL from the native derived table in the Order Items Explore.
On the left side navigation menu of the Looker User Interface, click Develop.
Under Projects, click on qwiklabs-ecommerce.
Click the arrow next to models to see the model files.
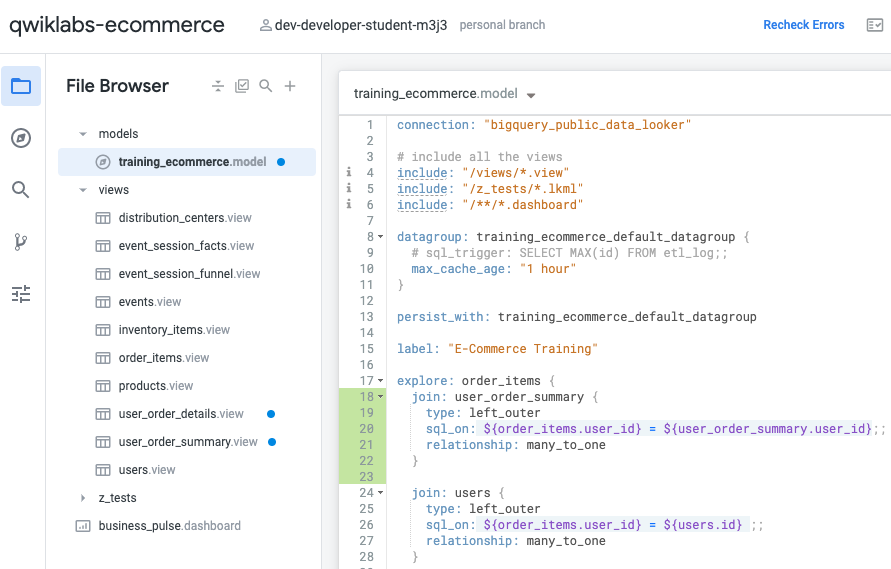
Click training_ecommerce.model to see the model file for the qwiklabs-ecommerce project.
In the explore: order_items definition, on a new line before join: users, define a new join using the following code:
The sql_on parameter identifies the join field as user_id. The relationship parameter identifies that there are potentially many instances of an user_id in order_items but only one instance of each user_id in user_order_summary, which is organized as one summary row for each user.
Open a new Looker window in a new tab.
On the left side navigation menu of the Looker User Interface, click Explore.
Under E-Commerce Training, click Order Items.
Click the arrow next to User Order Summary.
The available dimensions are listed in the data panel for User Order Summary. Notice that there are no measures for User Order Summary, and that the measures for Order Count and Total Revenue selected from Order Items are now dimensions in User Order Summary.
Under User Order Summary > Dimensions, click User ID.
Under User Order Summary > Dimensions, click Order Count.
Under User Order Summary > Dimensions, click Total Revenue.
Click Run to see the results.
Click on the SQL tab to see the SQL query generated by Looker.
Notice that the SQL contains a common table expression (CTE) identified by a WITH clause. This native derived table is considered ephemeral because it is generated at runtime as a CTE.
Derived tables can also be persisted, which means that they are stored in the underlying database. In a later task, you will persist this derived table, so that it can be written back to the database.
Navigate back to the user_order_summary.view file.
Click Validate LookML and then click Commit Changes & Push.
In the Commit window, add a message to specify the changes you made, and click Commit.
Click Deploy to Production.
Click Check my progress to verify the objective.
A key benefit of native derived tables is that you can leverage additional parameters to easily add new columns, including ones that do not already exist in the underlying data. For example, the derived_column parameter can be used to create a new column that does not already exist in the Explore used to define the native derived table.
In this task, you add a derived column to the native derived table that you created in a previous task. The new derived column will store the average order revenue per customer, which can be calculated from existing columns in the native derived table (i.e., total revenue per customer divided by the number of orders per customer).
After you create the derived column, you define a new dimension for the derived column in the user_order_summary view, so that business users can query the data in the Explore.
On the left side navigation menu of the Looker User Interface, click Develop.
Under Projects, click on qwiklabs-ecommerce.
Click on the arrow next to views to see the list of views.
Click user_order_summary.view to see the view file for the native derived table.
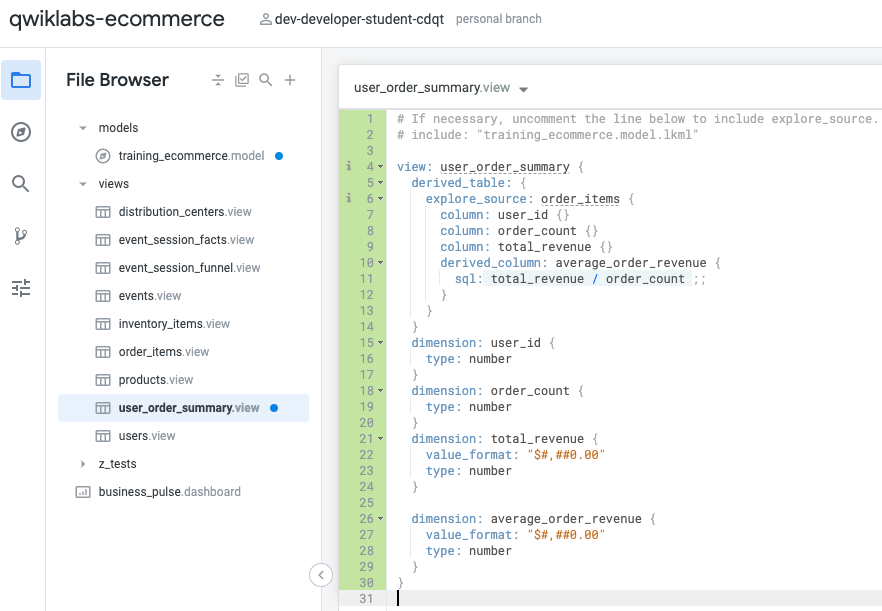
In the user_order_summary derived table definition, on a new line after column: total_revenue {}, define a new derived column using the following code:
Locate the dimension for total_revenue.
On a new line after the dimension for total_revenue, define a new dimension for average_order_revenue using the following code:
Open a new Looker window in a new tab.
On the left side navigation menu of the Looker User Interface, click Explore.
Under E-Commerce Training, click Order Items.
Click the arrow next to User Order Summary.
The available dimensions are listed in the data panel for User Order Summary.
Under User Order Summary > Dimensions, click User ID.
Under User Order Summary > Dimensions, click Order Count.
Under User Order Summary > Dimensions, click Total Revenue.
Under User Order Summary > Dimensions, click Average Order Revenue.
Click Run to see the results.
Click on the SQL tab to see the SQL query generated by Looker.
Notice that the CTE now includes a calculation for a new column named average_order_revenue, even though the underlying Explore used to create the native derived table (i.e. the Order Items Explore) did not originally contain this column.
For additional information on derived columns, review the Looker documentation about creating derived columns for calculated values.
Navigate back to the user_order_summary.view file. Click Validate LookML and then click Commit Changes & Push.
In the Commit window, add a message to specify the changes you made, and click Commit.
Click Deploy to Production.
Click Check my progress to verify the objective.
In the previous tasks, you created ephemeral derived tables, meaning that the tables are generated at run-time, rather than stored in the underlying database. In this task, you will persist a derived table, so that it is written back to the underlying database. Note that the steps to persist a derived table are the same whether it is a SQL derived or native derived table.
To persist a derived table, you need to add one of the following parameters to the definition of the derived table:
To learn more about these parameters, review the section on creating persistent derived tables from the Derived tables in Looker documentation.
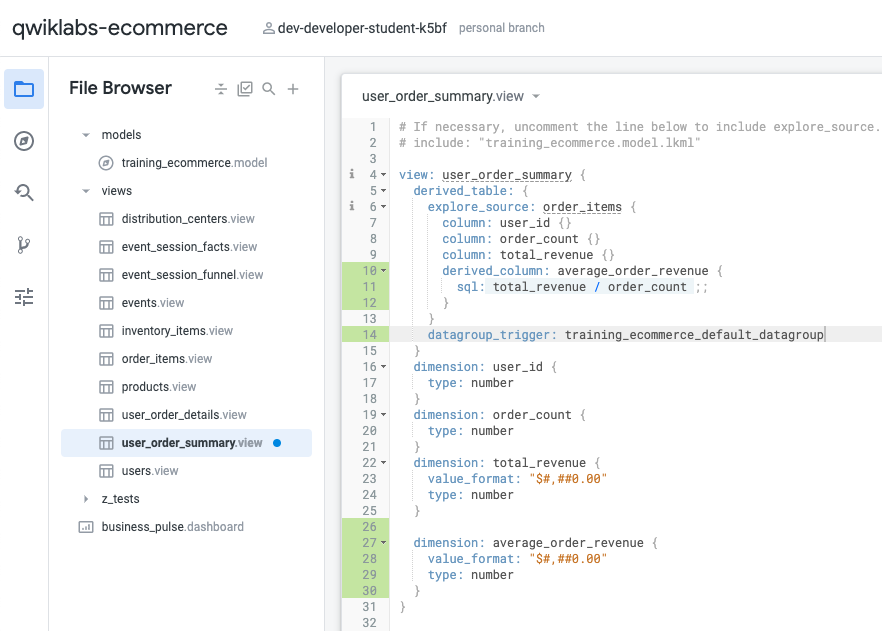
In this task, you persist the native derived table using the parameter datagroup_trigger, which rebuilds a persistent derived table based on a pre-defined datagroup (or Looker caching policy) defined in the model file.
For the native derived table named user_order_summary, you add training_ecommerce_default_datagroup as the datagroup_trigger, so that the persistent derived table will rebuild using the datagroup.
The training_ecommerce_default_datagroup is defined within training_ecommerce.model and includes a parameter to rebuild all objects defined in the model every hour.
On the left side navigation menu of the Looker User Interface, click Develop.
Under Projects, click on qwiklabs-ecommerce.
Click on the arrow next to views to see the list of views.
Click user_order_summary.view to see the view file for the native derived table.
In the derived_table definition, add a new line after the closing bracket (}) for explore_source: order_items, and paste:
Open a new Looker window in a new tab.
On the left side navigation menu of the Looker User Interface, click Explore.
Under E-Commerce Training, click Order Items.
Click the arrow next to User Order Summary.
The available dimensions are listed in the data panel for User Order Summary.
Under User Order Summary > Dimensions, click User ID.
Under User Order Summary > Dimensions, click Order Count.
Under User Order Summary > Dimensions, click Total Revenue.
Under User Order Summary > Dimensions, click Average Order Revenue.
Click Run to see the results.
Click on the SQL tab to see the SQL query generated by Looker.
After a few seconds, notice that the WITH clause has been replaced by a regular SQL SELECT statement. There is also a message saying that Looker will use the existing user_order_summary table.
This derived table is no longer generated as a CTE at run-time; rather, the derived table has been persisted using a datagroup and has been written back to the underlying database.
Navigate back to the user_order_summary.view file. Click Validate LookML and then click Commit Changes & Push.
In the Commit window, add a message to specify the changes you made, and click Commit.
Click Deploy to Production.
When you have completed your lab, click End Lab. Google Cloud Skills Boost removes the resources you’ve used and cleans the account for you.
You will be given an opportunity to rate the lab experience. Select the applicable number of stars, type a comment, and then click Submit.
The number of stars indicates the following:
You can close the dialog box if you don't want to provide feedback.
For feedback, suggestions, or corrections, please use the Support tab.
Copyright 2022 Google LLC All rights reserved. Google and the Google logo are trademarks of Google LLC. All other company and product names may be trademarks of the respective companies with which they are associated.

This content is not currently available
We will notify you via email when it becomes available

Great!
We will contact you via email if it becomes available

One lab at a time
Confirm to end all existing labs and start this one