arrow_back

Configuring VPC Network Peering

登录 加入
访问 700 多个实验和课程

Configuring VPC Network Peering

实验 1 小时 universal_currency_alt 5 积分 show_chart 入门级
info 此实验可能会提供 AI 工具来支持您学习。
访问 700 多个实验和课程

Overview

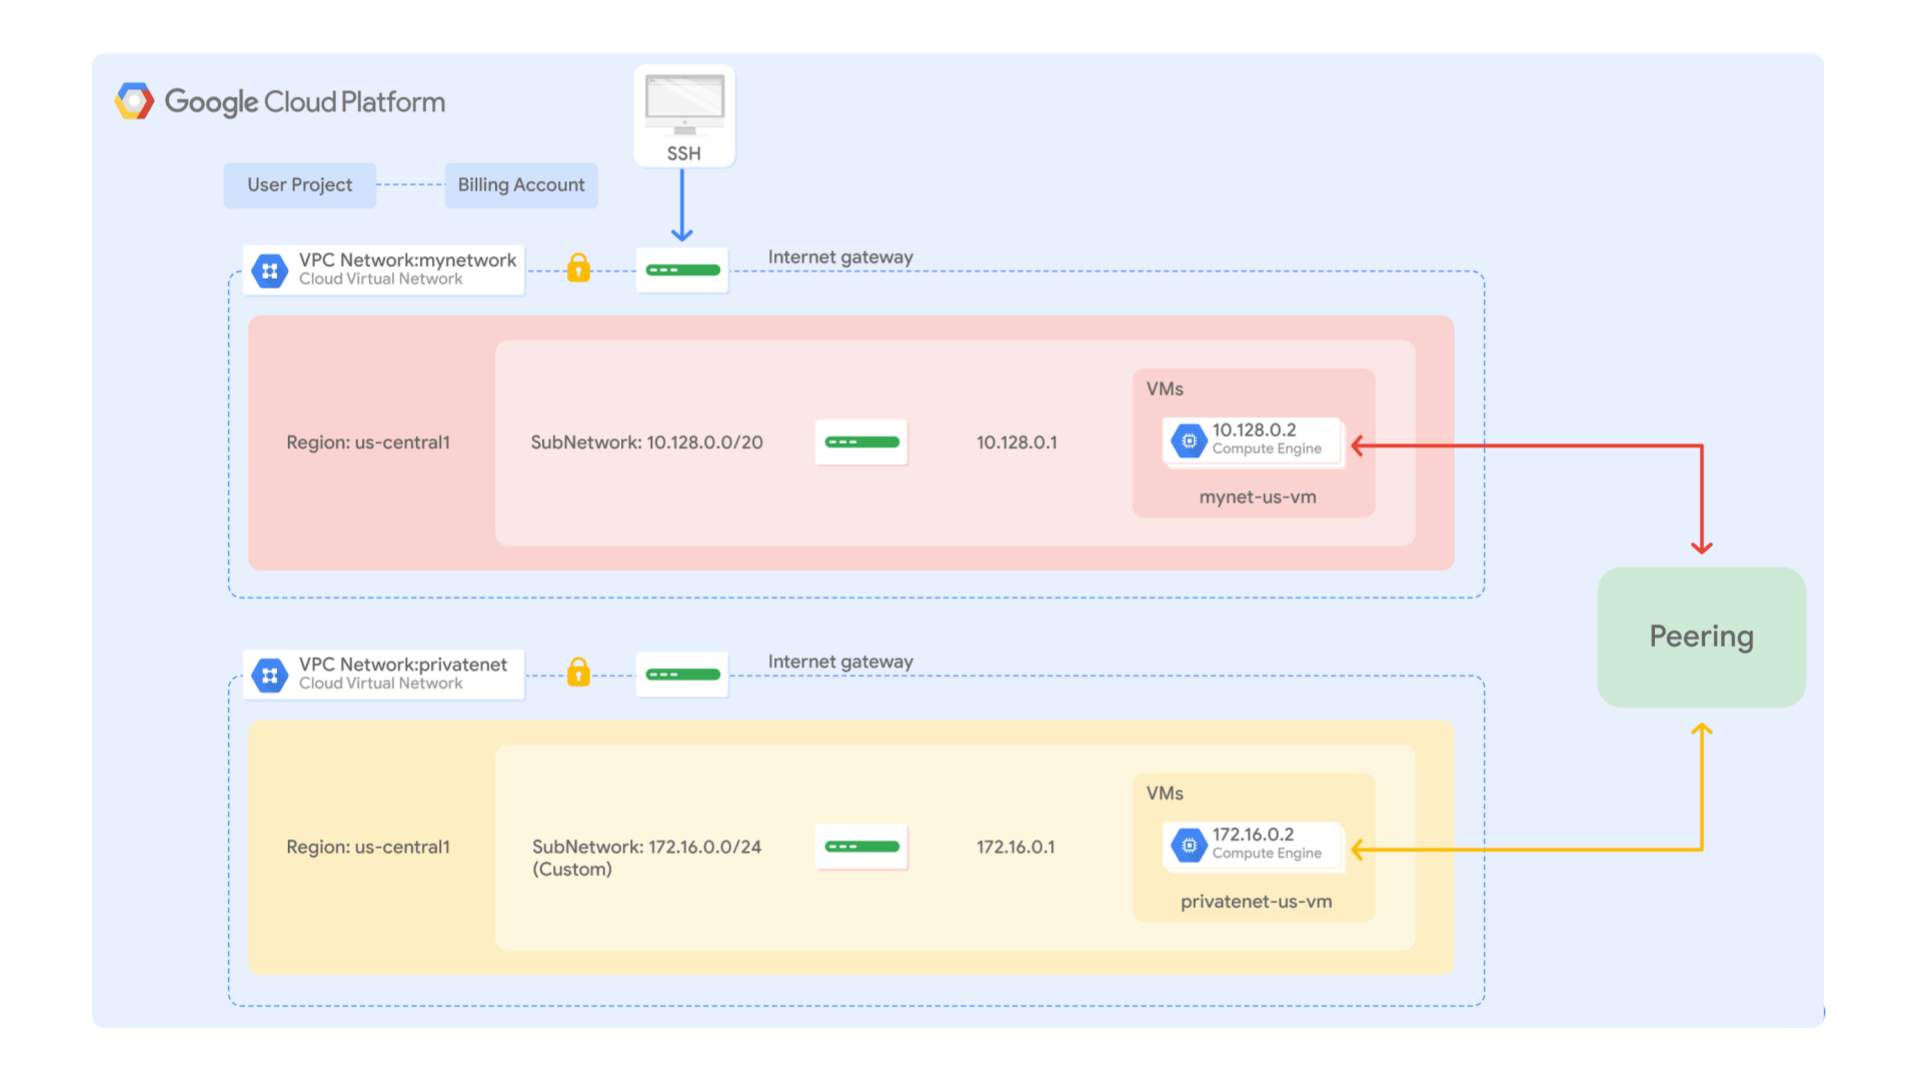
In this lab, you configure VPC network peering between two networks. Then you verify private communication between two VMs in those networks, as illustrated in this diagram.

Network architecture diagram

VPC network peering allows you to build SaaS (Software as a service) ecosystems in Google Cloud, which makes services available privately across different VPC networks within and across organizations. This allows workloads to communicate in private RFC 1918 space.

VPC network peering gives you several advantages over using external IP addresses or VPNs to connect networks, including:

  • Network latency: Public IP networking results in higher latency than private networking.
  • Network security: Service owners do not need to have their services exposed to the public internet and deal with its associated risks.
  • Network cost: Google Cloud charges egress bandwidth pricing for networks using external IPs to communicate, even if the traffic is within the same zone. If, however, the networks are peered, they can use internal IPs to communicate and save on those egress costs. Regular network pricing still applies to all traffic.

Objectives

In this lab, you will learn how to perform the following tasks:

  • Explore connectivity between non-peered VPC networks.
  • Configure VPC network peering.
  • Verify private communication between peered VPC networks.
  • Delete VPC network peering.

Setup and requirements

For each lab, you get a new Google Cloud project and set of resources for a fixed time at no cost.

  1. Click the Start Lab button. If you need to pay for the lab, a pop-up opens for you to select your payment method. On the left is the Lab Details panel with the following:

    • The Open Google Cloud console button
    • Time remaining
    • The temporary credentials that you must use for this lab
    • Other information, if needed, to step through this lab
  2. Click Open Google Cloud console (or right-click and select Open Link in Incognito Window if you are running the Chrome browser).

    The lab spins up resources, and then opens another tab that shows the Sign in page.

    Tip: Arrange the tabs in separate windows, side-by-side.

    Note: If you see the Choose an account dialog, click Use Another Account.
  3. If necessary, copy the Username below and paste it into the Sign in dialog.

    {{{user_0.username | "Username"}}}

    You can also find the Username in the Lab Details panel.

  4. Click Next.

  5. Copy the Password below and paste it into the Welcome dialog.

    {{{user_0.password | "Password"}}}

    You can also find the Password in the Lab Details panel.

  6. Click Next.

    Important: You must use the credentials the lab provides you. Do not use your Google Cloud account credentials. Note: Using your own Google Cloud account for this lab may incur extra charges.
  7. Click through the subsequent pages:

    • Accept the terms and conditions.
    • Do not add recovery options or two-factor authentication (because this is a temporary account).
    • Do not sign up for free trials.

After a few moments, the Google Cloud console opens in this tab.

Note: To view a menu with a list of Google Cloud products and services, click the Navigation menu at the top-left, or type the service or product name in the Search field. Navigation menu icon

Task 1. Explore connectivity between non-peered VPC networks

Each Google Cloud project starts with the default network. In addition, mynetwork, privatenet, and managementnet have been created for you along with firewall rules to allow ICMP-SSH-RDP traffic and four VM instances.

Verify VPC network peering requirements

In a peered VPC network, no subnet IP range can overlap with another subnet IP range. Therefore, verify that the CIDR blocks of the subnets of mynetwork and privatenet are non-overlapping.

  1. In the Google Cloud console, in the Navigation menu (Navigation menu icon), click VPC network > VPC networks.

  2. Examine the IP addresses ranges for the subnets of mynetwork.

    The subnets of mynetwork fit within the 10.128.0.0/9 CIDR block. As new Google Cloud regions become available, new subnets in those regions are automatically added to this auto mode network using an IP range from that block.

  3. Examine the IP addresses ranges for the subnets of privatenet.

    The subnets of privatenet fit within the 172.16.0.0/24 and 172.20.0.0/24 CIDR blocks. They do not overlap with the 10.128.0.0/9 CIDR block of mynetwork.

Note: You can configure VPC network peering between mynetwork and privatenet because their subnets' CIDR blocks are non-overlapping.

Explore the connectivity between mynetwork and privatenet

Before configuring VPC network peering, explore the current connectivity between mynetwork and privatenet.

  1. On the Navigation menu (Navigation menu icon), click VPC network > VPC network peering. Notice that there is no peering connection.

    You will return to this page to configure the VPC network peering connections.

  2. On the Navigation menu, click VPC network > Routes.

  3. Specify the following:

    Property Value (type value or select option as specified)
    Network mynetwork
    Region
  4. Click View. Notice that none of the routes have a peering connection as the Next hop.

    You will return to this page after configuring the VPC network peering connection.

  5. On the Navigation menu, click VPC network > Firewall. Notice the allow SSH and ICMP firewall rules under Protocol / ports for mynetwork and privatenet. These firewall rules have been created for you.

  6. On the Navigation menu, click Compute Engine > VM instances. Notice the mynet-notus-vm, mynet-us-vm, privatenet-us-vm, and managementnet-us-vm instances.

    These VM instances have been created for you.

  7. Note the internal and external IP addresses for privatenet-us-vm.

  8. For mynet-us-vm, click SSH to launch a terminal and connect.

  9. To test connectivity to privatenet-us-vm's external IP, run the following command, replacing privatenet-us-vm's external IP:

ping -c 3 <Enter privatenet-us-vm's external IP here>

This should work!

  1. To test connectivity to privatenet-us-vm's internal IP, run the following command, replacing privatenet-us-vm's internal IP:
ping -c 3 <Enter privatenet-us-vm's internal IP here> Note: This should not work, as indicated by a 100% packet loss! But why?
  1. On the VM instances page, click Columns, and then select Network.
Note: The mynet-us-vm and privatenet-us-vm instances are in the same zone () but in different VPC networks (mynetwork and privatenet). Because VPC network peering has not been configured between those networks, private communication fails between the instances of those networks.
  1. Please close the SSH terminal to mynet-us-vm before verifying objective:
exit

Click Check my progress to verify the objective. Explore connectivity between non-peered VPC networks

Task 2. Configure VPC network peering

VPC network peering can be configured for different VPC networks within and across organizations. Configure the following peering connections in this project:

  • peering-1-2: Peer mynetwork with privatenet
  • peering-2-1: Peer privatenet with mynetwork

Each side of a peering association is set up independently. Peering is active only when the configuration from both sides matches.

Create peering 1-2

Peer mynetwork with privatenet.

  1. In the Cloud console, in the Navigation menu (Navigation menu), click VPC network > VPC network peering.
  2. Click Create connection.
  3. Read through the requirements.
Note: You won't need the project ID because you are connecting to a VPC network within the same project.
  1. Click Continue.

  2. Specify the following, and leave the remaining settings as their defaults:

    Property Value (type value or select option as specified)
    Name peering-1-2
    Your VPC Network mynetwork
    VPC network name privatenet
Note: If you peered with a VPC network in another project, you would need the Network admin or Project owner/editor IAM role for that project to create a peering connection.
  1. Click Create.
Note: At this point, the peering status remains INACTIVE because the other side has not been configured, the networks are not yet peered.

Create peering 2-1

Peer privatenet with mynetwork.

  1. In the Cloud console, return to the VPC network peering page.

  2. Click Create peering connection.

  3. Click Continue.

  4. Specify the following, and leave the remaining settings as their defaults:

    Property Value (type value or select option as specified)
    Name peering-2-1
    Your VPC Network privatenet
    VPC network name mynetwork
  5. Click Create.

Note: As expected, the peering status changes to ACTIVE when the configuration from both sides matches.

Click Check my progress to verify the objective. Configure VPC Network Peering

Task 3. Verify private communication between peered VPC networks

Verify private RFC 1918 connectivity across mynetwork and privatenet.

Verify routes between networks

Verify that routes have been established between mynetwork and privatenet.

  1. In the Cloud console, in the Navigation menu (Navigation menu icon), click VPC network > Routes.
  2. For Network, select mynetwork.
  3. For Region, select .

Notice that there is a route for each subnet in mynetwork with peering-1-2 as the Next hop. If you switch to privatenet, notice that there is a route for each subnet in privatenet with peering-2-1 as the Next hop.

These routes were automatically created with the VPC peering connection.

Note: User-configured routes are not propagated across peered networks. If you configure a route in a network to a destination in a VPC network, that destination will not be reachable from a peered network.

Ping from mynetwork to privatenet

Try to ping the internal IP of privatenet-us-vm from mynet-us-vm.

  1. On the Navigation menu, click Compute Engine > VM instances.
  2. Note the internal IP address for privatenet-us-vm.
  3. For mynet-us-vm, click SSH to launch a terminal and connect.
  4. To test connectivity to privatenet-us-vm's internal IP, run the following command, replacing privatenet-us-vm's internal IP:
ping -c 3 <Enter privatenet-us-vm's internal IP here>

This should work because of the route that was established by the peering connection.

  1. Please close the SSH terminal to mynet-us-vm before verifying objective:
exit

Click Check my progress to verify the objective. Test connectivity to privatenet-us-vm's internal IP

Ping from privatenet to mynetwork

Similarly, try to ping the internal IP of mynet-us-vm from privatenet-us-vm.

  1. Note the internal IP address for mynet-us-vm.
  2. For privatenet-us-vm, click SSH to launch a terminal and connect.
  3. To test connectivity to mynet-us-vm's internal IP, run the following command, replacing mynet-us-vm's internal IP:
ping -c 3 <Enter mynet-us-vm's internal IP here>

This should also work because of the route that was established by the peering connection.

  1. To test Compute Engine DNS across peered networks, run the following command:
ping -c 3 mynet-us-vm

Output:

ping: mynet-us-vm: Name or service not known Note: Compute Engine internal DNS names created in a network are not accessible to peered networks. The IP address of the VM should be used to reach the VM instances in peered network.
  1. Please close the SSH terminal to privatenet-us-vm before verifying objective:
exit

Click Check my progress to verify the objective. Test connectivity to mynet-us-vm's internal IP and Compute Engine DNS

Note: Now that you've verified the VPC Peering connection, you could stop both instances to remove their external IP addresses. This helps secure your instances and reduces your networking costs. You can still SSH to an instance without a public IP address using Cloud IAP tunnels.

Task 4. Delete the VPC peering connection

Delete the VPC Peering connection and verify the deletion.

Delete the peering connection

Delete the peering-1-2 connection.

  1. On the Navigation menu, click VPC network > VPC network peering.
  2. Select the peering-1-2 connection.
  3. Click Delete.
  4. Click Delete to confirm the deletion. When the connection is deleted, notice the INACTIVE status for peering-2-1.
Note: Deleting one side of the peering connection terminates the overall peering connection.

Verify the peering deletion

Verify that routes no longer exist for the peering connection and that there is no private RFC 1918 connectivity across mynetwork and privatenet.

  1. On the Navigation menu, click VPC network > Routes. Notice that the VPC Peering routes have disappeared.
Note: Deleting one side of the VPC Peering connection removes all peering routes.
  1. On the Navigation menu, click Compute Engine > VM instances.
  2. Note the internal IP address for privatenet-us-vm.
  3. For mynet-us-vm, click SSH to launch a terminal and connect.
  4. To test connectivity to privatenet-us-vm's internal IP, run the following command, replacing privatenet-us-vm's internal IP:
ping -c 3 <Enter privatenet-us-vm's internal IP here> Note: This should not work as indicated by a 100% packet loss!
  1. Please close the SSH terminal to mynet-us-vm before verifying objective:
exit

Click Check my progress to verify the objective. Delete the VPC peering connection

Review

In this lab, you configured VPC network peering between two networks (privatenet and mynetwork). Then you verified private RFC 1918 connectivity across mynetwork and privatenet by pinging VMs on their internal IP addresses within those networks. Finally, you deleted one side of the VPC network peering connection to demonstrate that this removes private RFC 1918 connectivity across those networks.

End your lab

When you have completed your lab, click End Lab. Google Cloud Skills Boost removes the resources you’ve used and cleans the account for you.

You will be given an opportunity to rate the lab experience. Select the applicable number of stars, type a comment, and then click Submit.

The number of stars indicates the following:

  • 1 star = Very dissatisfied
  • 2 stars = Dissatisfied
  • 3 stars = Neutral
  • 4 stars = Satisfied
  • 5 stars = Very satisfied

You can close the dialog box if you don't want to provide feedback.

For feedback, suggestions, or corrections, please use the Support tab.

Copyright 2022 Google LLC All rights reserved. Google and the Google logo are trademarks of Google LLC. All other company and product names may be trademarks of the respective companies with which they are associated.

准备工作

  1. 实验会创建一个 Google Cloud 项目和一些资源,供您使用限定的一段时间
  2. 实验有时间限制,并且没有暂停功能。如果您中途结束实验,则必须重新开始。
  3. 在屏幕左上角,点击开始实验即可开始

使用无痕浏览模式

  1. 复制系统为实验提供的用户名密码
  2. 在无痕浏览模式下,点击打开控制台

登录控制台

  1. 使用您的实验凭证登录。使用其他凭证可能会导致错误或产生费用。
  2. 接受条款,并跳过恢复资源页面
  3. 除非您已完成此实验或想要重新开始,否则请勿点击结束实验,因为点击后系统会清除您的工作并移除该项目

此内容目前不可用

一旦可用,我们会通过电子邮件告知您

太好了!

一旦可用,我们会通过电子邮件告知您

一次一个实验

确认结束所有现有实验并开始此实验

使用无痕浏览模式运行实验

请使用无痕模式或无痕式浏览器窗口运行此实验。这可以避免您的个人账号与学生账号之间发生冲突,这种冲突可能导致您的个人账号产生额外费用。